Steven Morse personal website and research notes
Setting up a Gaming PC as a Remote ML/AI rig
Written on August 8th, 2024 by Steven MorseAlthough I currently use a Mac for most everyday use and coding/development stuff, I have a couple hand-me-down gaming PCs. Since these PCs have CUDA-compatible NVIDIA graphics cards, and my very dusty Macbook does not, I thought it would be fun to set one up as a “rig” for doing GPU-intensive deep learning projects.
The process was straightforward, in hindsight, but I’m writing this post as consolidated notes for future me since I had to collate steps/tips from multiple places around the interwebs. Hopefully it’s helpful for you, too.
In this first post, I’ll describe how to setup a Windows PC as an SSH server, and then remote into the PC from a Unix/Linux CLI (like a Mac). In the next post (forthcoming) (link here), I’ll describe how to setup a baseline environment for ML/AI development on the PC, using the available GPU, and how to remote into that environment with a Jupyter notebook. (Still pending: I may end up doing a third post on how to use a Raspberry Pi or something as a low-energy waking device so you don’t have to leave your big PC running all the time.)
Quick note on terms
EDIT The previous version of this post used confusing terminology. Now we are using this shorthand:
- Home-based computer running the server and ML environment = “remote machine”
- Wandering laptop = “local machine”
If this is confusing just think of the term as being relative to you — your laptop is “local” because it is with you, the client.
Also, my specific use-case is remote = PC (Windows), and local = Macbook (macOS). I imagine most reading this post are in the same boat — PC for gaming, Mac for work/dev stuff — but if not a lot of the material here is easily adapted over to a different OS setting.
Overview
There’s three lines of effort we need to complete:
-
IP addressing. We need to be able to access the remote machine from the open internet – this means we need to ensure we know our home outward facing IP address (WAN IP), and our remote (home) machine’s extension (i.e. LAN IP) within that, and make sure that IP is assigned/static, and make sure ports are setup to facilitate the connection.
-
SSH Server. We need to ensure a persistent SSH server service is running on the remote machine. Since in this tutorial our remote is a Windows PC, we’ll use OpenSSH Server (which I think is technically still in beta?) — if your remote is Linux, the functionality is more native.
-
Remoting in. Finally, we need to connect to the remote machine (“remote in”) using SSH. There are a couple possible wrinkles here I wanted to cover but this is the simplest step.
Our goal is to have a Terminal prompt open on our laptop, sitting in a cafe somewhere sipping a latte, with the PC’s CLI running within it, something like:
Microsoft Windows [Version 10.0.19045.4651]
(c) Microsoft Corporation. All rights reserved.

stmor@DESKTOP-DQ4CS31 C:\Users\stmor>
This allows us to control the remote machine, remotely, and do things like run Python kernels.
Step 1: IP addressing
In order to access our remote machine from anywhere on earth, we need to know its address, ensure that address doesn’t change, and also ensure ports are setup to facilitate the secure flow of information.
Let’s assume you have a very standard setup where you have a single Wifi router/modem connected to the internet via a coaxial cable into the wall. Other wrinkles – like mesh wifi, a router separate from the modem, etc – don’t really change things.
WAN IP. Your router has an IP address that is unique to it across the entirety of the internet. Any device connected to the router will appear to the internet as coming from the same address – try it: visit whatismyip.com from multiple devices in your home, you’ll get the same IP. Turn a VPN on and it’ll change. This is your address to the “wide area network”, aka WAN, aka The Internet. Think of this as your house telephone number, back in the day when everybody had landlines. Keep this number handy for later.
LAN IP. Each device on your home network has a local IP address that is unique within the home, but not unique across the internet. With the phone analogy, think of this as the device’s extension. This is the address on the “local area network” aka LAN. A router will, typically, assign these IPs dynamically from within a set range, like 196.168.85.20 thru 196.168.85.250.
You can find your device’s LAN IP a few ways. On a Mac, go in Terminal and use ifconfig – the inet line shows your LAN IP. On a PC, go in the Command prompt and use ipconfig – the IPv4 address shows your LAN IP.
Or, go to your router’s admin page on your browser – this is typically 192.168.0.1 or 192.168.1.1 (or Google it for your brand), and typically user/pwd is admin/admin or admin/password (or Google it for your brand and ISP). (Note: some routers, like Google Nest, demand you use the app, not a browser-based page.) Look for “Connected devices” or similar, click on one, and check the “IP address” matches what you got from the config in command line.
Static IP. In a moment, we’ll set the router to forward outside requests on a certain port to this specific LAN IP of your desired device. This port forwarding is done by pointing at a particular LAN IP, not device name, so it’s imperative we somehow freeze the LAN IP of our local machine. Otherwise, the router may dynamically re-address it, unbeknownst to us sitting in Antarctica trying to remote in, and our request will forward to our smart toaster.
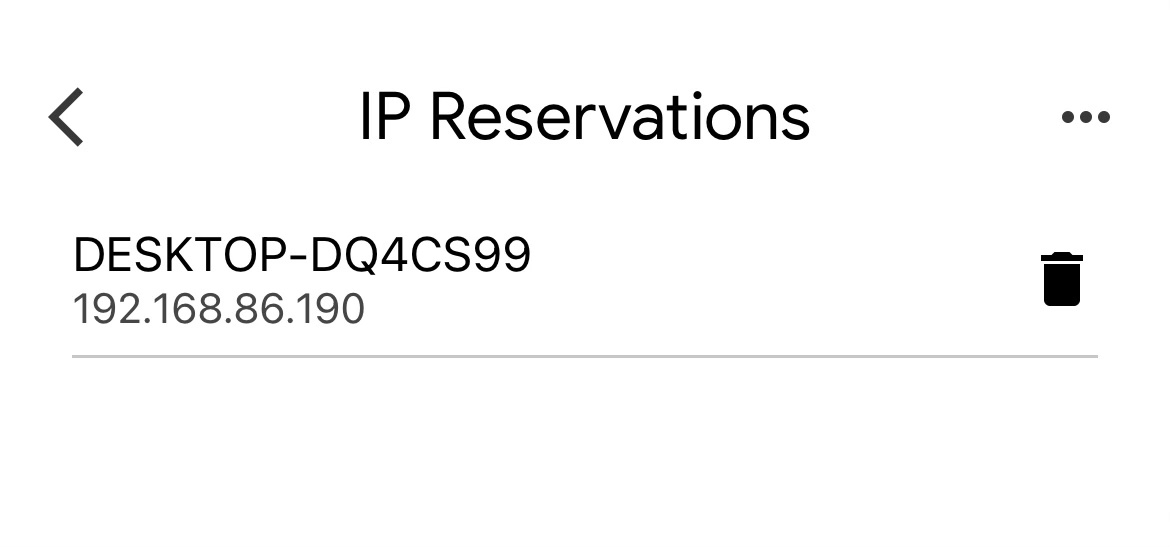
We can ensure a consistent local IP by assigning a static IP or reserved IP to the device – you can do this from the device (like here) or from the router. I prefer from the router – from the device means the device will always request the same IP when connecting to the router, but there is the possibility of a conflict if the router’s already given that IP out to the toaster, so I’d rather go top-down.
So, on the router, look for “Add a device with reserved IP” and add your device and an IP in the correct range – I’d use it’s current LAN IP. On Google Nest Wifi, this is in the Home app under Wifi > Network settings > Advanced networking > DHCP IP Reservations and looks something like this:
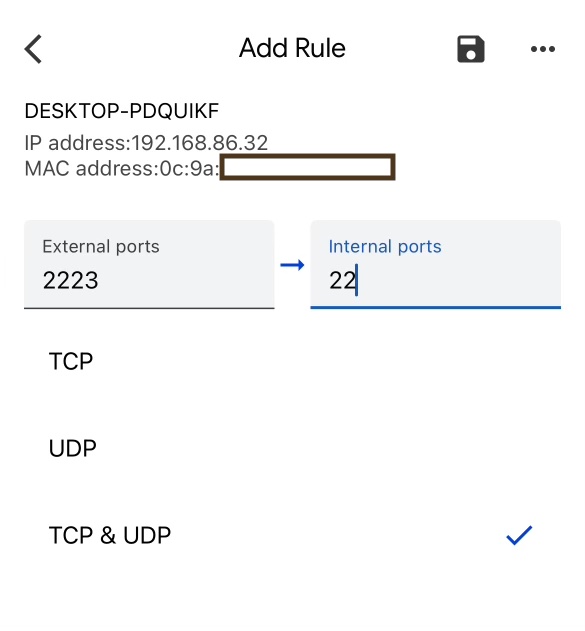
Port forwarding. Lastly, recall we want to remotely establish a connection to a particular device, not the whole home network. To do this, we send a request to the WAN IP (the router) on a particular port (I think you can think of this as basically an argument to the request, there’s obviously no physical port). The router needs to be pre-setup to forward requests on that port to the device we’re after, called port forwarding.
This is done in the router, typically in Advanced networking, and involves several elements:
-
Internal IP: Provide the internal IP address of the device you want to port forward to. Remember that it needs to be static/reserved (see above).
-
Protocols: Choose which transport protocols the port forwarding applies to, UDP (user datagram protocol) or TCP (transmission control protocol). If you have the option “both”, you should select this.
-
External Port: Specify which port the router will watch for incoming connections. Ports 0 to 1024 are pre-assigned, but anything about that is fair game – let’s say you choose 1234.
-
Internal port: Specify the internal port of the device you’re forwarding to – it should be 22, for the SSH protocol.
For Nest wifi, in Google Home, this looks something like:
Now you’ve got all the router / IP related setup taken care of. Onto the SSH server.
Step 2: SSH Server
We’d like to now remote into our local machine using some secured protocol. In the olden days, you may remember the default was to use Telnet. The most common current protocol is the Unix-based Secure Shell (SSH) network protocol, which connects an SSH client (your laptop) directly with an SSH server (your home desktop).
To SSH into our remote machine, we need to ensure a SSH Server is running persistently on it. For a Mac/Linux, this is built-in functionality and outlined here. For a Windows PC, until recently (2023 ish), this required either a third-party app or a very beta Windows service. However, now the OpenSSH service has expanded to include a Client and a Server service.
Basically, we want to initialize the OpenSSH Server service on our remote (Windows) machine, and set it to run automatically. That’s really it.
This process is straightforward, and outlined well on Microsoft’s help page here, but in summary:
(On Windows 10 devices:)
-
Open Settings, select System, then select Optional Features.
-
Scan the list to see if the OpenSSH is already installed. If not, at the top of the page, select Add a feature, then find OpenSSH Server, then select Install.
-
Open the Services desktop app. (Open
Run(for example withWindows+R), type services.msc in the search box.) Find and open OpenSSH SSH Server. -
On the General tab, from the Startup type drop-down menu, select Automatic, and click Apply.
-
To start the service, select Start.
That’s it – now your local Windows machine is persistently running a SSH server, which can receive and handle remote SSH requests.
Step 3: Remote in
The last step is to “remote in” to the remote machine from our laptop or whatever we have that is on the move, out in the arena, living its best life.
Since we’re assuming the local client is a Macbook or similar, we have access to an SSH client natively and can run directly in the Terminal app.
The basic syntax we’ll use is:
$ ssh -p <port> <user>@<host>
Let’s caveat each of these:
-
<port>refers to the external port we establish on the router to receive incoming connection requests (for example,1234), not the default SSH port 22. -
<user>refers to the user profile on the remote machine. There is often some uncertainty whether it needs to be<domain>\<user>or just<user>. In my case, I needed to include the domain. You can query what these ingredients are precisely by going on the remote machine to a command prompt and doing awhoamiquery:
C:> whoami
DESKTOP-DQ4CS31\stmor
And as an additional note, when you enter this into Terminal, you need to escape the \ character, so \\, which gives DESKTOP-DQ4CS31\\stmor.
<host>should be the WAN IP of your house router – remember, the landline number! Then when you call this IP, on port1234(or whatever), your router says “Ah! I know this one! I route this request to device (remote_machine) on IP (remote_machine_IP that_you_have cleverly_ensured doesnt_change)!”
So altogether, you’ll have something like:
$ ssh -p 1234 DESKTOP-DQ4CS31\\stmor@12.34.56.78
And the first time, you’ll get the following message:
The authenticity of host '[12.34.56.78]:1234 ([12.34.56.78]:1234)' can't be established.
ED25519 key fingerprint is SHA256:longstring.
This key is not known by any other names
Are you sure you want to continue connecting (yes/no/[fingerprint])?
and you will say yes. (This is saying, we the client can’t confirm the authenticity of this server (i.e. host) because its key fingerprint isn’t already in our database – can you confirm it?)
In you go. The last wrinkle is the password. For me, since I was connecting to Windows, I used the Windows account password associated with this <user>. NB this is not the PIN, or other weird Windows password stuff.
After a successful password entry, the shell will refresh to a Windows shell, something like:
Microsoft Windows [Version 10.0.19045.4651]
(c) Microsoft Corporation. All rights reserved.

stmor@DESKTOP-DQ4CS31 C:\Users\stmor>
and you’re off. (And remember this is the DOS batch language, not Bash/UNIX, so instead of ls you’re on dir, etc.)
Adding to your SSH config
It’s a little annoying to have to type ssh -p 1234 DESKTOP-DQ4CS31\\stmor@12.34.56.78 everytime you want to connect. I highly recommend creating an entry in your SSH config file (on your local machine, the laptop) that basically gives you a shortcut. Here’s mine:
In ~/.ssh/config:
Host home
  User DESKTOP-DQ4CS31\\stmor
  HostName 12.34.56.78
  Port 1234
Change the HostName and Port as appropriate, and now you can just do ssh home. You can go a step further and set up authentication also, so you don’t have to type in your password, but this is more involved so I’m omitting.
Parting thoughts
If this is your first time using your Windows PC for development, you’ll likely quickly find some basic amenities you lack in the command prompt that you’re used to as a Bash user. For example, Windows no longer has a native text editor in the terminal, so you’ll have to install something – for example, vim for Windows. Obviously this requires installing on the remote machine, and restarting your SSH connection.
It’s also worth just including a blanket caveat to take appropriate security precautions with this stuff – you may have noticed we’ve just established a way to access your home PC remotely with only a password, as this very basic tutorial is written, which is not ideal.
Looking ahead to the next concept, what we now want to do is initiate a python kernel on the remote machine from the remote SSH session, that we can hook to from the local client. So the remote is doing all the “work”, and we are controlling from our laptop. A basic idea and a common pattern if you’ve ever worked with computing clusters at a lab/wherever, but always a bit more exciting to do on your own equipment! Here’s a tutorial on that: link here.
Feel free to reach out on Twitter or email. Thanks for reading!
Written on August 8th, 2024 by Steven Morse