Steven Morse personal website and research notes
Setting up a Gaming PC as a Remote ML/AI rig (Part 2)
Written on August 22nd , 2025 by Steven MorseGot a desktop at home with a big GPU in it that you mainly just use for gaming? Why not turn it into your own personal remote machine for ML development??
In a previous post, I did a tutorial on how to “remote in” to your home desktop, by running an SSH server on it and doing some home wifi port forwarding.
In this post, we’ll look at getting some basic Python/PyTorch/Jupyter style development going. Specifically we’ll focus on two goals:
-
GPU-enabled PyTorch. First we’ll get Python installed, setup a virtual environment, install PyTorch, and make sure it’s GPU enabled.
-
Jupyter notebooks. Second, we’ll install
ipykernelin our venv so we can run a Jupyter notebook remotely from VS Code. I’ll also show how to run the kernel manually and hook to it from a browser, if you prefer that to VS Code.
Just imagine it — you, a scrub with no access to high performance computing resources, can now train models on a GPU, accessed from anywhere in the world, your once-humble gaming PC humming away at home, with renewed purpose and a sense of heroic élan.
Preliminaries
I’m going to assume you have read my previous tutorial and can SSH into your home desktop with something like ssh home with full command line access. I’m also going to assume your desktop is running Windows, because it is (was!) a gaming machine, and more importantly, because mine is and I’m writing this.
(I think Windows is really annoying to work with, and I actually thought of converting my PC to Linux, and I know gaming on Linux is becoming a thing, but that’s for a later date.)
Also before you get too excited, make sure you actually have a GPU. Mine is NVIDIA, so from the command line I can do:
C:\Users\stmor\> nvidia-smi
C:\Users\stmor\> nvidia-smi
Fri Aug 22 12:34:56 2025
+-----------------------------------------------------------------------------------------+
| NVIDIA-SMI 560.94                 Driver Version: 560.94         CUDA Version: 12.6     |
|-----------------------------------------+------------------------+----------------------+
| GPU  Name                  Driver-Model | Bus-Id          Disp.A | Volatile Uncorr. ECC |
| Fan  Temp   Perf          Pwr:Usage/Cap |           Memory-Usage | GPU-Util  Compute M. |
|                                         |                        |               MIG M. |
|=========================================+========================+======================|
|   0  NVIDIA GeForce GTX 1660 Ti   WDDM  |   00000000:01:00.0 Off |                  N/A |
|  0%   39C    P8              9W /  120W |     643MiB /   6144MiB |      0%      Default |
|                                         |                        |                  N/A |
+-----------------------------------------+------------------------+----------------------+
Note my humble GPU is running on CUDA Version 12.6 and has 6144 MiB = 6144/1024 GiB = 6 GiB (gibibytes, \(2^30\) bytes), or about 6.44 GB (gigabytes, \(10^9\) bytes).
If you have a different type of card, this won’t work. If you have no GPU, what are you doing here? Just kidding — some of this tutorial won’t apply to you but you can still get everything running CPU-only.
Installing Python
You have a few options to install Python. If you want to do it remotely (on the command line), you can use winget (native Windows Package Manager) and do:
winget install -e --id Python.Python.3.12
or if you prefer Chocolatey (a third-party package manager that seems pretty good), do:
choco install python --version=3.12.0
If you want to just hop on the desktop itself, you can use the official Python installer and run the .exe installer (make sure to check “Add Python to PATH”), or go to the Microsoft Store (which also adds it to your PATH).
Whatever option you choose, once complete, check you’re good from the command line with:
stmor@DESKTOP-DQ4CS31 C:\Users\stmor> python -V
Python 3.12.0
Setting up a project and venv
First, let’s create a little test project:
C:\Users\stmor\projects> mkdir torch-test
C:\Users\stmor\projects> cd torch-test
C:\Users\stmor\projects\torch-test>
Then, it is good practice to always work in virtual environments (if you are still doing everything in one big base environment like a barbarian, take the plunge now and get used to venvs). Let’s create one in our project:
C:\Users\stmor\projects\torch-test> python -m venv venv
This runs the venv module (-m venv) to create a venv named venv. (I like this pattern of venv in the project folder, always named “venv”, so I can create an alias like svenv that sources into my venv no matter where I am.)
(Caveat: If you prefer to put your project folders in a Dropbox/Google Drive/etc, do not create a venv there. The venv will have a billion files, which now your cloud storage will furiously attempt to sync. Recommend in this case, putting all venvs in a user-level dot folder, like C:\Users\stmor\.venvs)
Now let’s source into this venv. On Windows this looks like this:
C:\Users\stmor\projects\torch-test> venv\Scripts\activate.bat
(venv) C:\Users\stmor\projects\torch-test>
To test it out, let’s install numpy, which is a dependency of PyTorch anyway. I am just going to use pip for this tutorial, the default Python package manager. Yes I am aware uv is better and I use it also, but trying to keep things simple.
(venv) C:\Users\stmor\projects\torch-test> pip install numpy
Cool.
Installing PyTorch
Now we can install PyTorch and its dependencies in our venv. We need to make sure we install the right version of PyTorch that will be able to interact with our GPU via the CUDA interface (CUDA-enabled wheel matching your NVIDIA driver).
Run nvidia-smi and check your CUDA version, mine is CUDA Version 12.6 (see above).
This means I should install the corresponding PyTorch, in my case:
(venv) C:\Users\stmor\projects\torch-test> python -m pip install --upgrade --force-reinstall torch torchvision torchaudio --index-url https://download.pytorch.org/whl/cu126
For other drivers, go check out PyTorch’s install page.
Note: We only really want torch but it is generally good practice to install the vision and audio libraries also because there are a few commands that torch needs from the others even if you’re not doing vision/audio stuff.
To check we’re actually able to use the GPU, go into an interactive session and check torch.cuda.is_available(), like this:
(venv) stmor@DESKTOP-DQ4CS31 C:\Users\stmor\projects\torch-test> python
Python 3.12.10 (tags/v3.12.10, Apr  8 2025, 12:21:36) [MSC v.1943 64 bit (AMD64)] on win32
Type "help", "copyright", "credits" or "license" for more information.
>>> import torch
>>> torch.cuda.is_available()
True
Nice. If you get False, you’ve either installed the wrong PyTorch (uninstall, double check, reinstall), or have some deeper driver problem I can’t help you debug here.
So now you can go off and do ML stuff — train a neural net, download transformers and grab a huggingface model, etc. You are the captain now.
Running a Jupyter notebook
I’m going to cover two ways to do this.
-
VSCode way. This is a heavier lift upfront, but much easier later. Basically we will install a bunch of extensions in VSCode so we can just open a Jupyter notebook in VSCode and it does all the kernel handling in the background, and all we need installed in the venv is
ipykernel. -
Browser way. This is a smaller lift upfront, but more coordination involved every time you want to run a notebook. Basically we will manually run a Jupyter kernel from the command line, then set up port tunneling to it, and open it from a browser.
Jupyter in VSCode
VSCode is a free, open-source Integrated Development Environment (IDE) by Microsoft. Whether you’re just getting into coding or an experienced coder it’s a solid choice. I also personally think it’s better than, say, PyCharm. Two main reasons: it’s not Python-specific so it has a bigger support/extension community, and most of the current LLM-aided IDEs (Cursor, Windsurf, ..) are based on VSCode (“forks of” in Github terminology).
Anyway apart from IDE wars, let’s assume you’ve got VSCode or an equivalent downloaded. You’ll also need to install several extensions:
- Remote-SSH. This allows VSCode to remote into your home desktop via SSH, so you can be on your laptop working in the IDE, on code / venvs / etc that live on the desktop.
- Python. This provides basic support for Python coding. You can also get supporting extensions like Pylance, Python Debugger, etc.
- Jupyter. This lets you hook a notebook to a venv with
ipykernel, from within VSCode without having to manually run the kernel yourself.
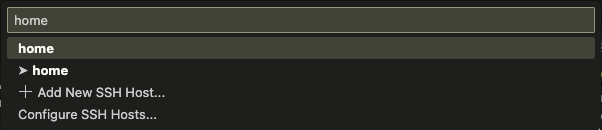
Once you have all that installed, in VSCode open the Command Palette (Cmd+Shift+P), and select Remote-SSH to go onto your home desktop. I have home in my ~/.ssh/config file (see previous post), so this connection step looks like this:
Now open the torch-test project folder, create a file, name it test.ipynb and let it open up.Voilà, you are in a Jupyter notebook.
However, you’re not yet hooked to a kernel so you can’t run any code (try it). Notice in the upper right corner, it says “Select kernel”. Hold that thought — we need to install a kernel-providing capability to our project venv. This is as simple as going back to your command line from before (make sure you’re still in the venv), and install ipykernel:
(venv) C:\Users\stmor\projects\torch-test> pip install ipykernel
Collecting ipykernel ....
Okay, now go back to VSCode and click “Select kernel”. It may prompt you to enable the Python and Jupyter extensions, and then you’ll have the option of selecting “Python Environments” or “Existing Jupyter server”.

Select “Python Environments”. (Existing Jupyter server would be if you manually start a kernel and want to hook to it, which we’ll look at later but is unnecessary). Now you have something like this:
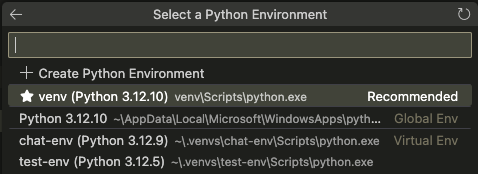
Notice the starred option is our venv in the current directory. It also detects venvs elsewhere in standard paths, for example you can see it’s showing some little venvs I keep in a .venvs directory. Select our project venv, the starred and recommended one. Now your notebook is attached to a Jupyter kernel running in the background, and you can test torch again:
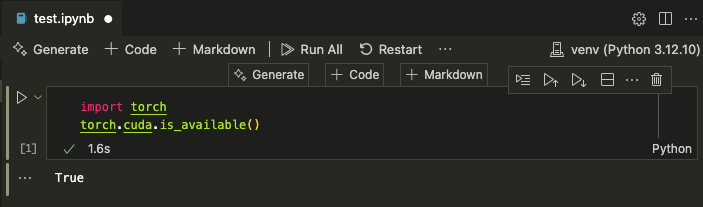
Yay! Off we go.
Jupyter in the browser
Now if you’re very stubborn and don’t want to use VSCode, or you just want to know how to do things more manually, there is another approach. Basically, we can manually launch a Jupyter kernel from the command line on our remote machine, then set up a “port tunnel” between our laptop and the desktop (essentially another layer of communication on top of an SSH connection), and then open that kernel in a browser window on our laptop.
First, in order to manually start a Jupyter kernel, we need to install the actual Jupyter package in our venv:
(venv) C:\Users\stmor\projects\torch-test> pip install jupyter
This is a much bigger set of packages than just ipykernel which is another reason I don’t prefer this approach. But anyway.
Now you can launch a Jupyter notebook kernel:
(venv) C:\Users\stmor\projects\torch-test> jupyter notebook --no-browser --ip=127.0.0.1 --port 8888
This says, launch a notebook (notebook) without opening the browser (--no-browser), on localhost (--ip=127.0.0.1), listening on port 8888 (--port 8888). (Make the port whatever you want but 8888 is common for whatever reason.)
You’ll see a bunch of extensions and other setup spit out, and then this blurb:
To access the server, open this file in a browser:
    file:///C:/Users/stmor/AppData/Roaming/jupyter/runtime/jpserver-1234-open.html
Or copy and paste one of these URLs:
    http://127.0.0.1:8888/tree?token=big-long-alphanumeric-token
You’ll want that URL + token in a sec. But first we need to setup a port tunnel that will allow your browser to talk to the remote machine.
On your laptop, in a new command line (not your SSH session), run:
ssh -N -L 8888:127.0.0.1:8888 home
Note: If you have not setup your ~/.ssh/config like I describe at the end this post, then you need to swap out home for the full specification of remote, like user@remote-host.
The rest of this command is doing an SSH, with -L local port forwarding, sending [LOCAL PORT]:[REMOTE ADDR]:[REMOTE PORT], and without creating a new shell (-N). Basically, we open the port 8888 locally to talk to the address 127.0.0.1 on the remote machine (home) and send through to port 8888 on the other side (where the Jupyter notebook kernel is pointing).
This command will just look like it’s hanging, which is fine.
Now copy that URL + token from the Jupyter kernel, and paste it into your browser.
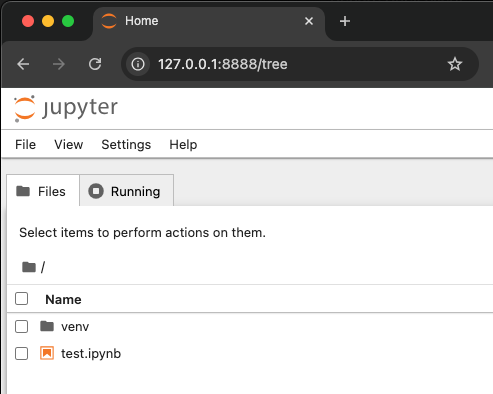
Go ahead and create a new notebook and test torch:
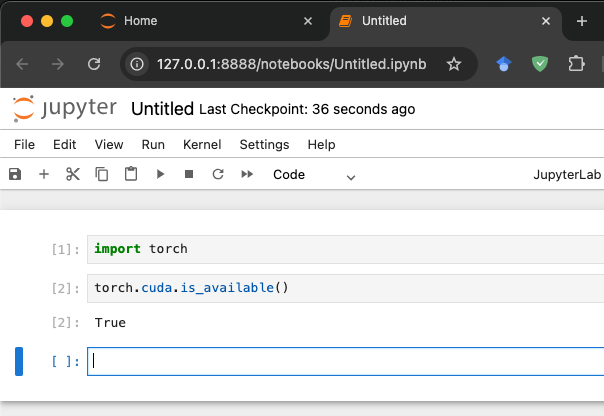
Ta-da! Off you go, on your unnecessarily manual Jupyter adventures. You can Ctrl-C out of the kernel and the tunnel once you’re done.
(By the way, I think there are ways to make some of this easier — for example browser extensions that can do the port tunnel.)
Parting thoughts
The next thing I’d like to do is setup a way to turn my home desktop on/off remotely, instead of leaving it running 24/7 or having to be physically present. For example, a Raspberry Pi that I can leave on 24/7 and has the ability to bring the desktop in/out of sleep.
I’ve also been doing a lot of tinkering with LLMs, so in another post I may show how to get Ollama running locally and use its API, which is pretty low-hanging fruit (it’s pretty easy).
Hopefully this was helpful to you and an empowering experience giving your gaming rig a little ML glow up. Thanks for reading!
Written on August 22nd , 2025 by Steven Morse